


I am so happy you decided to stop by!!
In my last post, I shared one side of our Colorful Summer Patio.....


Even though I had planned to share the other side of our Colorful Summer Patio as my next post, I could not wait to show you what I have been up to!!!
But first, I want to Thank these Hosts who were kind enough to feature my post, A Flower Bed or Two, from last week's Linky Parties......


And Thanks to Bev, over at Eclectic Red Barn, for featuring it from last week's Thursday Favorite Things Party!!!

And I also want to Thank Cecelia, over at My Thrift Store Addiction, for featuring my post, Wreaths, Embroidery, Garden Containers, A Moth and Another Amazing Sunset, where she showcased my succulent container......


Please stop by and link up to these wonderful parties!!
I have been contemplating making a Light House out of clay pots for about the past 4-5 years now but Time simply did not allow it.....
I have been researching this project for quite awhile now and pinning different Clay Pot Light Houses that I like on Pinterest....
At first, I thought I would make one for our back yard.....
But as I put it together and saw what it looked like once I finished it, even Joe agreed that it should go in the front of the house on our Front Porch!!!!
I was lucky enough to buy 3 clay pots at a new store in our area called Ocean State Job Lot.....
The 3 different sizes were $1.00, $2.00 and $3.00 respectively....
Cheap enough!!
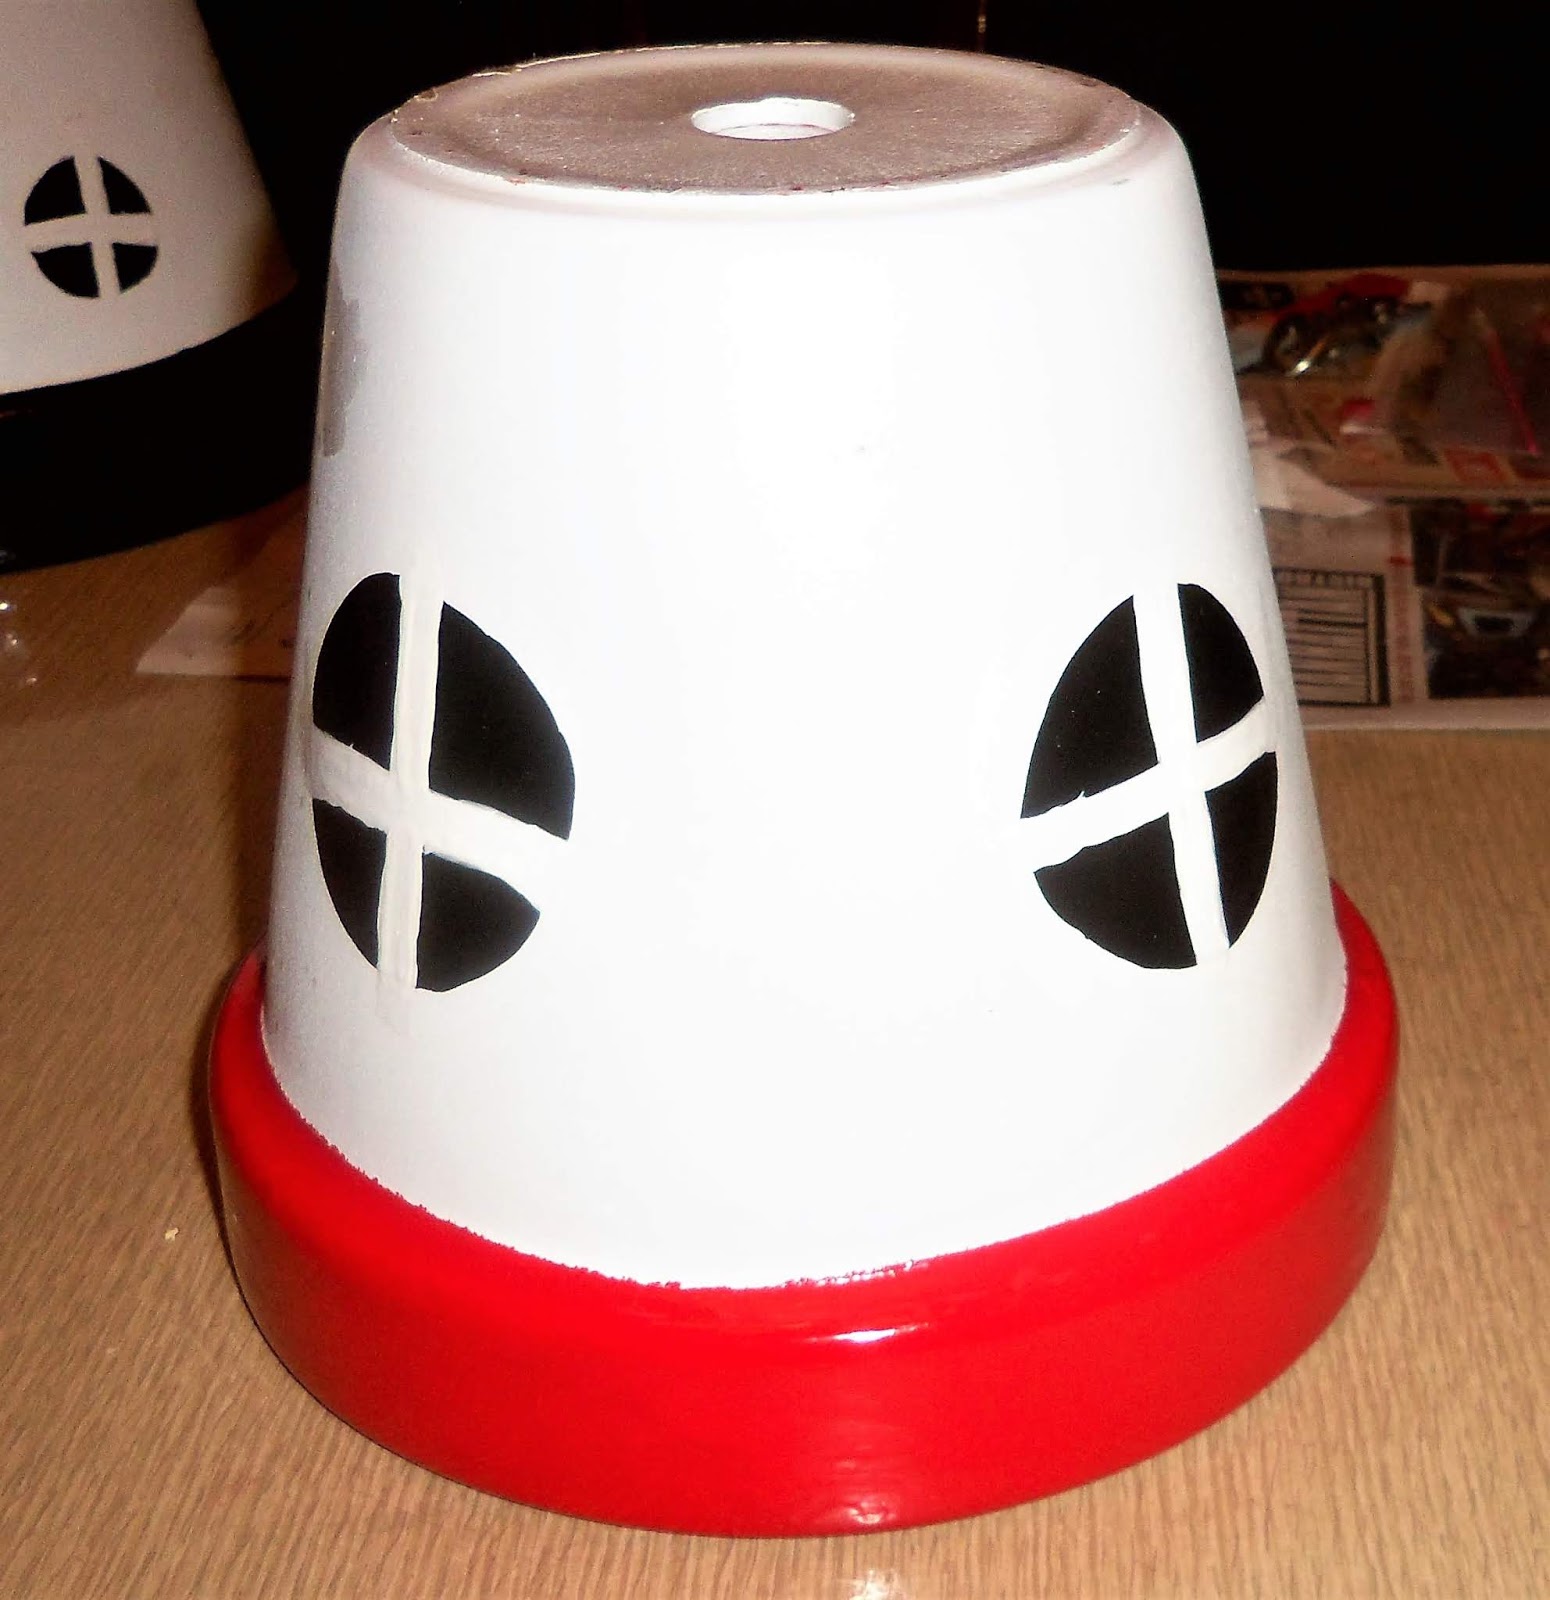
I started by spray painting all the pots white.....
I did not want to buy any new paint so I looked in our Storage room and decided to use what I had.....
I painted the rim of the large pot with black gloss paint....

It took 2 coats of paint......
I next found a clay saucer that I had outside and painted that red and black.....


Way too hot for me!!
Next, I painted windows around all 3 pots......


I went back to Ocean State Job Lot store which I must say has the largest collection of clay pots in all different shapes and sizes that I have ever seen, and I bought this for $6.50.....


I used E 6000 glue to adhere the pots together......

I glued these together.....


Next I had to decide how I was going to spruce up my Light House a bit so I got out my stash of shells that came from my dear neighbor Elly, who painstakingly picked them on Miami Beach when she lived there during the Winters and cleaned and separated them all by size!!!!
You may remember that Elly's sons were going to throw them out and I rescued them and used them to make them into ornaments for my "Under the Sea" Tree that i set up in the Living Room after the 4th of July.....


I brought the 2 parts outside and sprayed them with a clear sealer since it will be on the porch which is exposed to the elements......


When I sprayed the base with the sealer, the rocks took on a shiny appearance, almost like they were wet which I was thrilled about because the blue base is supposed to look like the Sea......


$12.50 for the clay pots
$5.00 for blue spray paint
$6.00 for the Solar Light
$2.00 for 2 bags of River Rocks


And to think that some people actually asked me what will I do with myself once I am retired and not working!!!
Silly People!!!

Thanks to those who took the time out of their busy day to spend a little bit of time with me!!
If you do not have a blog, PLEASE give me some way to reply to your comment, maybe by including your email in your comment. If I can not find a way to reach you, I will reply on the post where you commented so please check back......

Celebrate Summer Link Party
SUNDAY
Snickerdoodle Sunday
Silver Pennies Sunday
Happiness is Homemade Linky Party
MONDAY
Inspire Me Monday
Love Your Creativity Link Party
Busy Monday
Over the Moon Linky Party
Merry Monday Linky Party , now Bimonthly, open for 2 weeks
Creative Mondays
You Are The Star Blog Hop
Metamorphosis Monday
Little Cottage Link Party
Project Inspired Weekly Link Party
Celebrate Your Story Monday Night Link Party!
Make It Pretty Monday
Merry Monday Linky Party , now Bimonthly, open for 2 weeks
Creative Mondays
You Are The Star Blog Hop
Metamorphosis Monday
Little Cottage Link Party
Project Inspired Weekly Link Party
Celebrate Your Story Monday Night Link Party!
Make It Pretty Monday
TUESDAY
Tuesdays At Our Home
Inspire Me Tuesdays
Sizzle into Summer Party
Talk of the Town Party
Party in Your PJ's
Waste Not Wednesday
Style Showcase
Wall to Wall DIY Wednesday Link Up Party
A Gathering of Friends Link Party, every 2nd and 4th Tuesday
THURSDAY
Vintage Charm
Home and Garden Party Thursday
Share Your Style Thursday Link Up Party
Inspired Creations Linky Party
Thursday Favorite Things Blog Hop
Grace at Home Party
The Homemaking Party
FRIDAY
Friday Features Linky Party
Friday Favorites
Home Matters Linky Party
Flaunt It Fridays
Weekend Blog Hop
Funtastic Friday
SATURDAY
Saturday Sparks
Pink Saturday-Anything Goes!!
Best of the Weekend Party
Please take some time to visit these terrific hosts and all those joining in on the fun!

What an adorable creative lighthouse. I love it. You really come through on this project. I love everything about it. I especially like where you put it. And you thought of every angle, how it will look. You really thought of everything. You should be proud of your creative work. Retirement. . . you are going to enjoy and love all creativity you have time to do. Hugs, Karie
ReplyDeleteWhat a great make, you are an inspiration.
ReplyDeleteHow clever, Debbie! I love it.
ReplyDeleteI love, love, LOVE this!!!! My hubs is a lighthouse nut...so he and I are going to make some like this! You are so inspiring!!!
ReplyDeleteHugs,
NIna
Nina,
DeleteI could not get in touch with you any other way so I am responding here....Thanks so much for your kind words and thanks for taking the time to visit!! I am so glad that you liked this post about my little light house project!!
Hugs,
Deb
I love your lighthouse. Could you show a picture of it lit up at night?
ReplyDeleteMary,
DeleteThanks so much for stopping by!! I will share a picture of the lighthouse lit up in my next post...It will be about new rugs in the Living Room...
Hugs,
Deb
fabulous job on your lighthouse, nice that you found somewhere with all the sizes, love the added rocks
ReplyDeleteOh my goodness! Look at your crafty self! Loving that light house!!!! Hugs and blessings, Cindy
ReplyDeleteThe lighthouse is so cute! I am going to have to make one with the grand girls. I love that!
ReplyDeleteIt's hot as the dickens here, terrible.
betsy
Oh my goodness dear friend, you are so talented ! The homemade lighthouse came out awesome, who would imagine how you did it ! Your front yard for the Summer is gorgeous Debbie !
ReplyDeleteThank you for your kind and smart comment on my blogging struggle, as we both have gone thru the same feelings. I can relate to what you write. I just posted something on it, a sort of a decision hubby made me see.
Big hugs,
Fabby
You did a great job making that lighthouse out of clay pots Debbie! I love it and you are so talented and creative. It looks great on your porch.
ReplyDeleteHave a nice day and week. :)
It turned out beautifully! I made one several years ago, but have seen much better ones since then and have been planning on making a new one. I really love the lantern you put on top, and the river rocks. I will definitely be using this for my inspiration!
ReplyDeleteCherryl,
DeleteThanks so much for stopping by and for your kind words!! I could not find any other way to get in touch with you so I am doing so here. I was lucky enough to find the exct type of solar light that i was looking for!!
Hugs,
Deb
I can't believe you made that light house. So creative! It's darling.
ReplyDelete#creativeinspirationslinky
That lighthouse is such a creative use of pots. Thanks for sharing at the Weekend Blog Hop at My Flagstaff Home. --Jennifer
ReplyDeleteI like your lighthouse. Very creative with the solar light on the top. You did a great job. I like the windows. Have a good weekend. Thelma.
ReplyDeleteYour lighthouse is just darling, Debbie! Thank you for sharing at Party In Your PJ's!
ReplyDeleteLove the lighthouse and other shell crafts! So cute!
ReplyDeleteDebbie, your lighthouse is wonderful! Thanks for the shout-out and for sharing at Vintage Charm!
ReplyDeleteOh my, this lighthouse is so cute! Thank you for sharing.
ReplyDeleteAmy,
DeleteThanks so much for stopping by and for taking the time to leave such a kind comment!! I could not get in touch with you any other way so I am doing so here...
Hugs,
Deb
Debbie,
ReplyDeleteI just love this lighthouse. So adorable. Congrats, you are being featured on Wonderful Wednesday Blog Hop.
https://eclecticredbarn.blogspot.com/2019/07/wonderful-wednesday-blog-hop_23.html
Hugs,
Bev
Brilliant!!! Pun totally intended, Debbie. ;) I love your lighthouse with its two backdoors and your garden is lovely there!!! I'm so glad you shared this at Share Your Style so it could be featured here in the summer. I don't know if you correspond with Thelma up in Quebec,Canada, but she has a series on her blog Thelma's Days (or Thel's Days) where she tours the coast and shares the lights there. You and your readers would probably enjoy visiting her site!
ReplyDeleteHappily shared (and ready to make one!) at this week's SYS #217,
Barb :)
That is so, so cute. Great job. It's featured over at my place, today. I just adore it.
ReplyDeleteCute lighthouse and also the beachy ornaments! I love nautical type crafts. Thanks for stopping by and linking up #GatheringofFriendsLinkParty 3
ReplyDelete